
How to Install Ubuntu on VirtualBox
It is easy to use virtualbox software that allows you to use multiple operating systems simultaneously. As the various operating systems have its own professional and cons, using virtual machine software gives computer users the ability to get all the benefits!
Many video games have been written to work with Windows and Linux is popular for ease of use) and are very popular in programmers.) For this reason, many Windows users choose to install a Linux distribution on virtualboxes.
VirtualBox is also great for users who just want to try a different operating system before doing a one-day format! In fact, many virtualbox users have many virtual machines installed for different purposes, even if they are just trying a new operating system, things get organized / separated, or to hide files from others using your computer (Keep password-protected as each virtual machine.)
This tutorial will show you how to install Ubuntu, one of the most popular Linux distributions, on your VirtualBox.
What You'll Need
Before we get started, you will need a few things to ensure that you are able to successfully install Ubuntu on your VirtualBox.
- VirtualBox - If you need help installing it, check out the tutorial on how to install VirtualBox.
- Hard drive space - You will need to have an idea of how much available space you have on your computer. This is so you know how large you can make your virtual machine. If you have Windows, open "My Computer" and look to how much space you have available on your (C:) drive.
- Ubuntu iso - You can download the latest version of Ubuntu here. You can either save the iso onto your computer or you can burn it as an image to a CD, it's your choice. This tutorial uses Ubuntu 11.04 (Oneiric Ocelot), but you can use any release. I also assume you've saved it to your computer.

Creating a Virtual Machine for Ubuntu
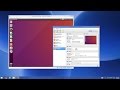
Once you've got everything together, you're ready to configure VirtualBox so that you can create a Ubuntu virtual machine. Open VirtualBox and you will be greeted by the Oracle VM VirtualBox Manager.
Since you will be creating a brand new virtual machine, click the button labeled "New." A window that says "Welcome to the New Virtual Machine Wizard!" will pop-up Go ahead and click next.
The next window says "VM Name and OS Type."
In the field, type a name for your machine. You can name it pretty much whatever you want I usually name my computers and virtual machines with robot or dinosaur names, but a common rule of thumb is to include the name of the operating system in your virtual machine so you can quickly tell different virtual machines apart.
The area called "OS Type" is asking for the operating system you will be using. Select "Linux" from the drop down menu labeled "Operating System." Under the drop down menu labeled "Version" select "Ubuntu." Click next


The next window will be called "Memory" and you will be asked to select Base Memory size. Just leave the recommended settings as next and next click next window will be called "virtual hard disk". This will show you the Recommended size of the boot hard disk, leave the default settings and hit the next you will be taken to the "Create new virtual disk wizard" window where you will click next.
In the "Hard Disk Storage Type" window, you will be asked to choose either the dynamically expanding storage that starts and grows smaller as you use space or in fixed-size storage where You allow maximum amount - You will not allow any additional space on the virtual machine. You can choose whatever you want, if you are not sure which wizard to provide some details of each, this tutorial assumes that you select fixed-size storage. Click Next."

In the "Hard Disk Storage Type" window, you will be asked to choose either the dynamically expanding storage that starts and grows smaller as you use space or in fixed-size storage where You allow maximum amount - You will not allow any additional space on the virtual machine. You can choose whatever you want, if you are not sure which wizard to provide some details of each, this tutorial assumes that you select fixed-size storage. Click Next."
You will be taken to the "Virtual Disk Location and Size" window which asks how much space you would like to allocate to your virtual machine. The "location" area will be pre-filled with the information you gave in previous steps, so leave it as is.
The "size" area is where we will use that information regarding how much space is left on your computer. Here you will decide how much space to give to your Ubuntu virtual machine. Don't give it less than 8GB of space as you won't have much room on it, but don't give it more space than you have on your computer. You also want to make sure you leave yourself room on your computer.
The computer used in the tutorial has 100GB of free space, so I will give my Ubuntu virtual machine 30GB of space. After you've decided how much space to give your virtual machine, click next.
The next screen will give you a summary of the steps you've taken. Click "finish" to start creating the hard disk. It may take several minutes for the hard disk to be created. When the wizard finishes creating the hard disk, another "Summary" window will pop-up. Click "finish."
After finishing the configurations, a "settings" window will pop-up. You can go through each of the settings and change things as you see fit. This tutorial assumes you've left everything as is.
On the left-hand side of the "Oracle VM VirtualBox Manager" screen, you will see your new virtual machine. Select your virtual machine and click the start button. A window titled "First Run Wizard" will pop up. Click next.
The next window will ask you to select the installation media. Click the little folder with the area and navigate to where you have the Ubuntu iso saved. Select the Ubuntu iso and click "open." Click next. The next window will give you a summary, click "finish."


Installing Ubuntu on Your Virtual Machine
Your virtual machine will boot, but you have not been able to complete yet. At this point, you do not have Ubuntu installed yet, you are still running the ISO off. Because you are running from the ISO, Ubuntu will actually look slower, the next steps will show you how to install Ubuntu on your virtual machine
An "Install" window will ask you what language you want to install Ubuntu and whether you want to install Ubuntu or use Ubuntu. Choose your language and install Ubuntu
The next window will give you many recommendations and tell you whether you meet each one or not. Make sure you complete each recommendation, as it connects to the Internet, makes it easy to install the installation process if you want "download updates while installing" and / or "install this third-party software Select "and click" Next ".

The next window will inform you that it has not detected any operating system and will give you two options "Delete disk and install Ubuntu" (a horror 'This disk' will delete files on memo) and "something else". Select "Erase Disk and Install Ubuntu", as there is no file on the disk you have created ... so it is ok to lose those non-existent files. Click "Forward"
The next window will show you the format you are formatting, click on "Install Now". The installation process takes several minutes, but keep an eye on the machine, as you will ask the common questions in the format (like your time zone).
The next window will show you the format you are formatting, click on "Install Now". The installation process takes several minutes, but keep an eye on the machine, as you will ask the common questions in the format (like your time zone).


Have you used Ubuntu before?
When the process is complete, a window saying "Installation Complete" will pop up. Click "Restart Now."
While the new operating system is rebooting, there will be a message saying "Please remove installation media and close the tray (if any) then press ENTER:" To do this, click "Devices" at the top of the window and hover over "CD/DVD devices". You should see a device with Ubuntu in the name with a check mark next to it. Click this device to remove the check mark, then press Enter.
While the new operating system is rebooting, there will be a message saying "Please remove installation media and close the tray (if any) then press ENTER:" To do this, click "Devices" at the top of the window and hover over "CD/DVD devices". You should see a device with Ubuntu in the name with a check mark next to it. Click this device to remove the check mark, then press Enter.
You have successfully installed Ubuntu on a virtual machine using VirtualBox, congrats! Some final things you will want to do is run any updates in Ubuntu and install guest additions. Since updates automatically start up in Ubuntu (and can be found in Ubuntu's menu system) I'll just show you how to install the guest additions.
In your Ubuntu virtual machine window, click "devices" then click "install guest additions." Click "okay" on the window that pops up, then click "run" in the next window. The installation process may take several minutes. When the installation is complete, it will say "press return to close this window" so go ahead and hit "enter."
You are ready to use your virtual machine. Whenever you want to access it, just open up VirtualBox, select your virtual machine and hit "start." Enjoy your Ubuntu virtual machine!
How to Install Ubuntu on VirtualBox
 Reviewed by It E Research
on
December 21, 2017
Rating:
Reviewed by It E Research
on
December 21, 2017
Rating:
Reviewed by It E Research
on
December 21, 2017
Rating:


.png)


No comments